
Planning a hardwood, laminate, luxury vinyl plank, or glue-down flooring project? Make subfloor moisture part of your preparation, not an afterthought. Excess moisture can contribute to wood movement, swollen seams, adhesive problems, and costly repairs. The challenge is that a subfloor may look dry while moisture remains below the surface or varies from one area to another. Knowing how to test subfloor moisture before installing flooring can help you identify warning signs, select a suitable test, and compare results with the product requirements. We’ll walk through the steps, from checking for leaks and damage to deciding when it’s wise to call a flooring professional.
Key Takeaways
- Choose the right moisture test: Wood and concrete require different methods. Check the flooring, underlayment, and adhesive instructions before testing.
- Compare results with product-specific limits: Test several locations, record the method and readings, and don’t apply one moisture threshold to every flooring system.
- Fix moisture issues before installation: Find and address the source, allow the subfloor to dry, then retest. Ask a flooring professional to review results that remain high or unclear.
Why Test Subfloor Moisture Before Installing Flooring?
A subfloor can look dry and still contain enough moisture to affect a new floor. Testing before installation helps identify concerns early, so you can address them before they lead to damage, extra work, or delays.
Prevent wood movement, cupping, buckling, mold, and adhesive failure
Excess moisture in a wood subfloor can transfer to the flooring above. Hardwood may swell, warp, or cup as it absorbs moisture. Persistent dampness can also create conditions that support mold growth. For glue-down flooring, moisture may interfere with the adhesive bond and cause the floor to loosen or fail.
Repairs can be costly, especially if damaged flooring has to be removed to reach the source of the problem. Testing gives you a chance to spot moisture issues and allow the subfloor to meet the flooring manufacturer’s requirements before installation begins. This is one reason subfloor moisture checks matter for hardwood flooring.
See how moisture affects hardwood, laminate, luxury vinyl plank, and glue-down flooring
Each flooring material and installation system has its own moisture requirements. Hardwood can expand or contract as moisture levels change. Laminate may swell at the seams, while luxury vinyl plank can have problems if moisture affects the subfloor or the installation system. Glue-down flooring also depends on the adhesive’s moisture limits and the condition of the surface beneath it.
There is no single reading that works for every project. Check the instructions for the flooring, underlayment, and adhesive, and use the testing method they specify. Subfloor preparation guidance explains why readings should be considered alongside the flooring system being installed. A flooring professional can help confirm which requirements apply to your project.
Find hidden leaks or dampness before they delay installation or damage new flooring
A quick visual check may not reveal a small plumbing leak, dampness near an exterior wall, or moisture entering through a crawlspace. Stains, musty odors, swelling, and soft spots can signal a problem, but moisture testing may uncover concerns before they affect the new floor.
If a reading is unusually high, pause installation and look for the source. Address leaks or other moisture problems, then retest before proceeding. This can help prevent avoidable delays and protect your flooring from damage. ValorCraft Flooring includes subfloor preparation as part of its flooring services, helping ensure the surface is ready for installation.
Prepare the Subfloor and Choose a Test
Before measuring moisture, inspect the subfloor and check the installation instructions for the flooring system you plan to use. The right test depends on whether the subfloor is wood or concrete, and on the requirements set by the flooring, underlayment, and adhesive manufacturers. A reading is only useful when you know which method to use and what limit to compare it with.
Make sure the room is in the conditions required for testing and installation, and gather the right tools before you begin. Plan to test several locations, including areas near plumbing, exterior walls, or visible damage. A visual inspection can help you spot concerns, but it can’t confirm that the subfloor is ready. Plastic-sheet tests have limits, too: treat them as a basic screen, not a substitute for the method required by the manufacturer. If you find signs of moisture or damage, address the cause before installing new flooring. Careful preparation can help prevent delays and give your flooring installation a sound starting point.
Check for leaks, stains, musty odors, soft spots, and swelling
Look across the entire floor for water stains, discoloration, swelling, or other signs of moisture. Pay close attention around plumbing, exterior walls, doors, and appliances that use water. A musty odor or a soft, spongy area may indicate lingering dampness or damage beneath the surface. On wood subfloors, a soft spot can mean the material has weakened and may need repair or replacement.
Don’t cover a suspicious area with new flooring before you understand what caused it. Check for an active leak or another source of moisture, and arrange repairs before testing further. This subfloor preparation guide outlines common signs of damage and why affected areas may need attention before installation.
Check moisture-testing requirements for the flooring, underlayment, and adhesive
Read the installation instructions for each part of your flooring system: the flooring, underlayment, and adhesive, if applicable. The products may have different moisture limits or specify different testing methods. A result that meets one product’s requirements may not meet another’s, so check each set of instructions before choosing a test.
This is especially important with concrete, where acceptable readings vary by flooring product and adhesive. Don’t rely on a general guideline or a test method simply because you already have the tool. Confirm that the manufacturers accept it and note the limits you’ll need to meet. The subfloor preparation guidance also recommends following the flooring maker’s moisture requirements for concrete.
Stabilize indoor temperature and humidity as product and test instructions require
Bring the room to the temperature and humidity conditions specified in the flooring and test instructions before taking readings. Keep those conditions stable for the period recommended by the manufacturer. Readings taken while a space is unusually cold, warm, or humid may not reflect the conditions the flooring will experience after installation.
If the room has recently been heated, cooled, or ventilated differently, allow conditions to settle before testing. Don’t assume a subfloor is ready just because its surface looks dry, particularly after a leak or water exposure. Moisture may remain below the surface, and prolonged dampness can damage wood flooring. This guidance on drying hardwood after water damage explains why damp conditions deserve prompt attention. Use the product’s specific instructions rather than relying on a single room reading.
Gather a suitable moisture meter or concrete test kit and plan to test multiple locations
Choose a test method that matches the subfloor material and is accepted by the flooring and adhesive manufacturers. Wood subfloors are commonly checked with a moisture meter designed for wood. Concrete may require a specific test kit or method. Before testing, read the tool’s instructions and check any setup, calibration, or material-setting requirements.
Plan to test several locations around the room rather than relying on one reading. Include areas near exterior walls and plumbing, as well as spots where you noticed stains, swelling, or other changes. Testing different parts of a wood subfloor can help reveal inconsistent moisture levels, as explained in this guide to checking subfloor moisture. Record each result and its location so you can compare the readings with the product requirements.
Use visual inspections and plastic-sheet tests to screen, not confirm subfloor readiness
A visual inspection can reveal stains, cracks, swelling, or surface damage that may need repair. On concrete, for example, cracks or chips may require patching or leveling, depending on their size and location. These checks help identify areas to investigate, but they don’t measure moisture within the subfloor.
A plastic-sheet test may offer a basic indication that moisture is present. Follow the test instructions, secure the sheet to the floor, and check for condensation or darkening beneath it. Treat any sign of moisture as a reason to investigate further. The test doesn’t provide a precise reading or replace a method required by the flooring or adhesive manufacturer. If you’re unsure how to assess the floor or prepare it for installation, review ValorCraft Flooring’s flooring and subfloor services.
How Do You Test Moisture in a Wood Subfloor?
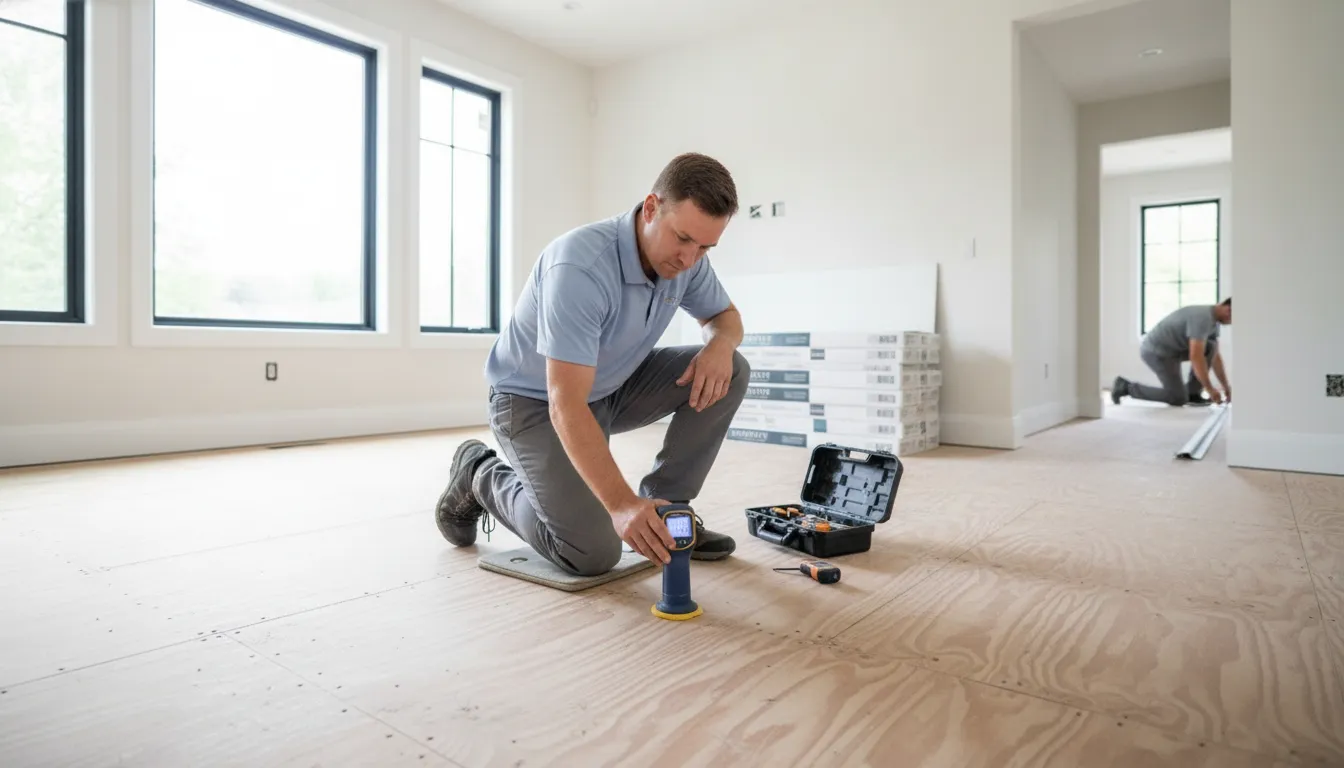
A wood moisture meter can help you determine whether a subfloor is ready for flooring, but one reading won’t tell you everything. Results may vary from one part of the room to another, and the right way to interpret them depends on the wood, the meter, and the flooring product you plan to install.
Start by checking the flooring manufacturer’s installation instructions. They should specify the accepted test method, moisture limits, and whether you need to compare the subfloor’s moisture content with the flooring. Gather a meter intended for wood, read its operating instructions, and plan to test several locations.
Look for visible signs of moisture before taking readings, such as stains, swelling, soft spots, or discoloration. Include areas near plumbing and exterior walls in your test plan, along with any spots that seem damp. Record your results so you can compare them with product requirements and retest specific locations if needed.
If readings exceed the product’s limits or vary sharply across the room, pause installation and investigate. ValorCraft Flooring’s flooring services include subfloor preparation, an important step in getting the surface ready for a new floor.
Choose a pin or pinless meter suited to the wood
Pin meters use probes that enter the wood, while pinless meters measure through a sensor placed against its surface. Both can be useful, but choose a meter designed for wood and follow its instructions for the material you’re testing.
For a pinless meter, check the sensor’s reading depth. If it measures deeper than the subfloor’s thickness, it may pick up moisture from another layer and affect the result. Wagner Meters’ guidance explains why reading depth matters when testing wood in a layered floor assembly. If you aren’t sure which meter or setting suits your subfloor, check with the meter manufacturer or a flooring professional before relying on the readings.
Check calibration, settings, and species-correction instructions
Before testing, confirm that the meter is set for the type of wood you’re measuring. Some meters require a species correction because different woods can produce different readings at the same moisture content. Follow the meter’s instructions for choosing the species setting and interpreting the display.
Check calibration as well. Some meters include a calibration block that helps confirm the device is working as expected. If the meter fails the check, consult its instructions or contact the manufacturer before using its readings to make an installation decision. Moisture Meter’s testing guidance recommends checking calibration and settings before testing. Keep the settings consistent across test locations so you can compare results.
Test across the room, including near exterior walls, plumbing, and damp areas
Test several places throughout the room rather than relying on a single reading. Moisture levels can differ across a subfloor, particularly near exterior walls, plumbing, appliances, or areas affected by spills and leaks. Include the center of the room, as well as any spots with staining, swelling, softness, or other signs of dampness.
Use the same meter settings at each location and follow the instructions for positioning the sensor or inserting the pins. Avoid testing directly over metal fasteners unless the meter’s instructions allow it. Moisture Meter recommends testing multiple areas because one reading may not reveal a damp area elsewhere in the room. If a result is much higher than the others, investigate that location and retest before proceeding.
Record each reading and compare it with the flooring manufacturer’s limits
Keep a log of your results, including each reading, its location, the date, and the meter settings. If you used a species correction, note that too. A simple room sketch with marked test points makes it easier to spot patterns and return to the same locations for another test.
Compare your readings with the flooring manufacturer’s moisture limits and test instructions. Requirements can vary by product, so don’t assume a reading that meets one flooring product’s specifications will work for another. Wood Floor Business recommends documenting readings so you have a clear record to check against product requirements. If a result is close to or above the stated limit, verify your test setup and ask the manufacturer or installer how to proceed.
Compare subfloor and flooring moisture content when required
Some wood-flooring instructions call for testing both the subfloor and the flooring, then comparing their moisture content. This helps determine whether the materials meet the manufacturer’s requirements before installation. If the difference is outside the allowed range, the wood may change as conditions shift, which can contribute to movement after the floor is installed.
Use the meter settings recommended for each material, including the correct species setting where applicable. Take readings at multiple points on both the subfloor and flooring, then compare the results with the manufacturer’s stated limits. Tramex explains the value of comparing flooring and subfloor moisture. If the instructions don’t specify a comparison, or you’re unsure how to interpret the results, ask the flooring manufacturer or a qualified installer before continuing.
How Do You Test Moisture in a Concrete Subfloor?
A concrete slab can look dry while moisture remains inside it or moves up from below. Since flooring and adhesive systems have different requirements, check their installation instructions before choosing a test. Record the method and results, and have a flooring professional help if the instructions or readings are unclear.
Use a method accepted by the flooring and adhesive manufacturers
Check the instructions for your flooring, underlayment, and adhesive. They should identify which moisture test to use, how to perform it, and what results the products allow. Requirements vary between products, so a test accepted for one installation system may not be suitable for another.
If the instructions don’t specify a method, contact the manufacturer before testing. A flooring professional can also help confirm that the test fits your project and that the slab is ready for installation. ValorCraft Flooring’s subfloor preparation services can help address the condition of the concrete before new flooring goes down. For general guidance, review the manufacturer’s moisture-testing recommendations.
Follow ASTM F2170 for in-situ relative humidity testing
ASTM F2170 measures relative humidity inside a concrete slab with probes placed in drilled holes. Unlike a surface check, this method assesses moisture conditions within the slab. Accurate results depend on following the standard’s requirements for hole depth, preparation, probe placement, and the time needed for readings to stabilize.
For a slab drying from one side, probes are generally placed at 40% of the slab’s thickness. Setup errors can affect results, so follow the applicable instructions or have a trained professional perform the test. Wagner Meters’ overview of common RH testing errors explains why careful testing matters.
Follow ASTM F1869 for calcium chloride testing when specified
ASTM F1869 measures moisture vapor emissions from a concrete slab using anhydrous calcium chloride. The test material is placed on prepared concrete beneath a sealed cover for the period specified by the standard. The result estimates the rate of moisture vapor emissions from the slab’s surface.
Use this test only if the flooring and adhesive manufacturers accept it. ASTM F1869 measures surface emissions, so it is not a substitute for in-situ relative humidity testing when ASTM F2170 is required. Follow the test kit’s directions for preparing the surface and positioning the test. Wagner Meters describes common concrete moisture-test errors, including issues that can make readings unreliable.
Use surface meters and plastic-sheet tests only to screen for moisture variation
A concrete-compatible surface meter can help identify areas that may be wetter than others. However, its readings do not confirm that the slab meets the requirements for flooring installation. Surface conditions and the concrete itself can affect readings, so treat the meter as a screening tool and confirm results with the method specified for your flooring system.
A plastic-sheet test can also flag possible moisture: tape a sheet tightly to the concrete and check for condensation or darkening beneath it after the time specified in the test instructions. A dry-looking sheet does not prove the slab is ready. Learn about the limits of surface moisture meters before relying on one to assess a concrete subfloor.
Don’t rely on a room hygrometer to measure moisture inside the slab
A room hygrometer measures the temperature and relative humidity of the air. It can help you monitor indoor conditions, but it cannot measure moisture within concrete or determine how much moisture is moving through a slab. A comfortable room reading does not confirm that a concrete subfloor is ready for flooring.
Use a hygrometer only for the purpose described in the product instructions, such as checking indoor conditions during installation. To test the slab, use the method accepted by the flooring and adhesive manufacturers. If results seem inconsistent, check the test setup and ask a flooring professional to assess the subfloor before installation.
What Moisture Levels Are Acceptable?
For wood, follow product limits and any required moisture difference between flooring and subfloor
There is no single moisture reading that works for every wood floor. A range of 6% to 9% is sometimes used as a general reference for wood subfloors, but acceptable readings can vary with the flooring product, local conditions, and test method. Treat that range as a starting point, not a pass-or-fail rule. Check the flooring manufacturer’s instructions for its moisture limit and any required difference between the flooring and subfloor.
That difference matters because wood can absorb or release moisture after installation. If the materials have substantially different moisture content, the boards may move as they adjust. The wood subfloor preparation guide provides a general reference, but always follow the requirements for your specific flooring.
For concrete, compare results with limits for the test method, flooring, and adhesive
Concrete moisture limits depend on the test method and the materials going over the slab. In-situ relative humidity tests and calcium chloride tests use different procedures and report different results, so their numbers cannot be compared directly. Check the flooring, adhesive, and underlayment instructions to learn which test methods they accept and what limits apply. Some systems also call for a moisture-control product if a reading exceeds the stated limit.
One hardwood installation guide, for example, recommends a concrete reading of 65% relative humidity or lower after a digital hygrometer has been in place for at least 24 hours. That is a product-specific reference, not a universal limit. Review the concrete moisture testing guidance, then confirm the requirements for your flooring system.
Check test units and methods before comparing results with manufacturer requirements
Before interpreting a reading, identify what was measured, how it was measured, and which units the test reports. Wood meters commonly show moisture content as a percentage. Concrete tests may report relative humidity or moisture vapor emission. These results measure different things, so a number from one method cannot be compared with a limit written for another.
Check the meter settings and test instructions, then compare your result with the manufacturer’s limit for that method and unit. If the installation instructions call for a specific test, use it or ask a flooring professional to confirm whether another method is accepted. Keeping a record of the method and result helps clarify whether the subfloor meets the product requirements.
Don’t apply one moisture threshold to every subfloor or flooring system
A reading that is acceptable for one installation may not be suitable for another. Hardwood, laminate, luxury vinyl plank, and glue-down flooring have different requirements. Adhesives and underlayments may also have separate moisture limits. The subfloor type matters, too: wood and concrete require different testing approaches, and their results are reported in different units.
Use the instructions for the flooring, adhesive, and underlayment together to decide whether the subfloor is ready. Avoid relying on a general online number or assuming a surface reading confirms that a concrete slab is dry. If results conflict or seem unusually high, verify the test setup before installation. A flooring professional can help interpret readings and recommend next steps. ValorCraft Flooring’s installation services include subfloor preparation for North Carolina projects.
Record and Interpret Test Results
Log readings, locations, date, method, and indoor temperature and humidity
A moisture reading only tells part of the story unless you record where, when, and how you took it. Write down the date, test method, equipment used, and each measurement. Mark test locations on a simple floor plan or number them in a list, so you can return to the same spots for another reading.
Note the indoor temperature and relative humidity, too. For wood subfloors, include the meter settings and any species correction. For concrete, record the test method and units. These details help you and your installer interpret the results accurately. A wood floor moisture-testing guide also recommends keeping thorough records to avoid confusion when reviewing readings.
Test enough areas to spot inconsistent or unusually high readings
A single reading cannot represent an entire floor. Moisture levels may vary from one part of a room to another, especially near plumbing, exterior walls, or areas with a history of leaks. Take readings at multiple locations, following the testing instructions from the flooring, underlayment, and adhesive manufacturers. Mark each location so you can repeat the test there if needed.
Review the readings for patterns and outliers. Similar measurements across the room may indicate consistent conditions, while one unusually high result could signal a localized moisture issue or a testing problem. Record the variation and investigate it rather than relying on an average that might hide a concerning result. Testing several areas can help identify moisture differences between boards or sections of a subfloor before installation begins.
Recheck unexpected results and verify the meter, setup, and conditions
If a reading seems high or differs sharply from nearby measurements, pause and check your setup. Confirm that the meter is set for the material you’re testing and that you followed the equipment instructions. Check the meter’s condition and calibration requirements, too. For concrete tests, make sure the location and preparation follow the selected test method.
Repeat the measurement at the original spot, then check nearby areas. Record each result so you can see how readings compare. Incorrect settings, poor contact, or equipment that needs calibration can affect accuracy. The moisture-testing guidance recommends verifying calibration and test conditions when results seem unreliable. If you still can’t explain an unusual reading, ask a flooring professional to review the method and results before work continues.
Allow time to dry and retest instead of relying on one reading
A moisture test captures conditions at a specific moment. If readings exceed the flooring or adhesive manufacturer’s limits, pause installation and identify the source of moisture before deciding on next steps. Once the source has been addressed, allow the subfloor time to dry. Then test again using the same method and, when possible, the same locations. Add the new readings to your log so you can compare them with earlier results.
Drying time depends on the material, the cause of the moisture, and indoor conditions. A surface that feels dry may still hold moisture below. Follow the product and test-kit instructions, and use test results rather than appearance alone to assess readiness. This subfloor moisture guide also recommends letting the subfloor dry and testing again before flooring is installed.
Keep records to confirm the subfloor meets product requirements before installation
Before installation, compare your documented readings with the requirements for the flooring, underlayment, and adhesive. Check that you’re comparing the same test method and units. For wood flooring, confirm whether the manufacturer specifies an acceptable moisture difference between the flooring and subfloor. Keep the product instructions with your test log so everyone working on the project can refer to the same requirements.
Clear records make it easier to confirm that the subfloor is ready and to flag concerns before new flooring covers it. If readings remain inconsistent or you’re unsure how to interpret them, ask a flooring professional to review the results. ValorCraft Flooring provides flooring installation and subfloor preparation services across North Carolina, with in-house crews focused on preparing each project carefully.
What Should You Do if the Subfloor Is Too Damp?
If moisture readings exceed the limits for your flooring system, pause installation and address the moisture before laying the new floor. Covering a damp subfloor can trap moisture and lead to problems with the flooring, adhesive, or subfloor over time. The right response depends on the source of the moisture, the subfloor material, and the flooring products you plan to install.
Start by confirming the reading with a suitable test method. Check the flooring, underlayment, and adhesive instructions for their moisture requirements, since acceptable readings vary by product and test method. If a result seems unusually high, take additional readings in different areas and check that the meter or test setup is being used correctly. A flooring discussion about moisture readings also highlights why test methods and product limits matter when assessing a subfloor.
Look for signs that can help identify the source, such as water stains, swelling, musty odors, soft spots, or damp areas near plumbing and exterior walls. A dry-looking surface does not always mean the subfloor is ready. Find and fix the cause, allow the material to dry, and retest before installation. If moisture persists or the subfloor appears damaged, ask a flooring professional to assess the area and recommend next steps.
Pause installation and find the moisture source
Hold off on installing flooring until you confirm the readings and understand why the subfloor is damp. Check that you used a test method suited to the material, whether it is wood or concrete, and compare the results with the requirements for the flooring, underlayment, and adhesive. If a reading seems out of place, verify the meter or test setup and take readings in several locations.
Look for water stains, swelling, musty odors, or dampness near plumbing, exterior walls, and doors. These clues can help narrow down where moisture may be entering. Avoid relying on a single reading or a general moisture threshold, since limits differ by product and test method. Use the flooring manufacturer’s installation instructions as the reference for the system you plan to install.
Repair leaks, drainage problems, or crawlspace moisture before drying
Drying a subfloor before fixing the source of moisture can lead to the same problem returning. Check for leaking pipes, water entering around doors or windows, and poor drainage near the foundation. If the home has a crawlspace, look for standing water, damp soil, or signs that moisture is affecting the subfloor from below.
Have a qualified plumber or crawlspace specialist address issues that require their expertise. Once repairs are complete, check the subfloor again to see whether readings have stabilized. Moisture that remains high may point to a problem beyond routine drying. This subfloor preparation guide explains why it’s important to investigate potential leaks and crawlspace conditions before installing new flooring.
Use ventilation or dehumidification when appropriate, then retest
After correcting the moisture source, give the subfloor time to dry. Depending on the room and conditions, fans can improve airflow, while air conditioning or a dehumidifier may help manage indoor humidity. Follow the flooring and test instructions for temperature and humidity conditions, since these can affect both readings and installation.
Retest after drying, using the same reliable method, and record the results. Don’t judge readiness by touch alone: moisture may remain inside the material even when its surface feels dry. Concrete slabs, in particular, may need an appropriate test to assess moisture within the slab. Wagner Meters shares guidance on airflow and moisture issues in concrete subfloors. If readings remain above the product’s limits, continue investigating before installation.
Replace structurally damaged or mold-affected subflooring
Some subfloors need more than drying. Wood that feels soft, spongy, or unstable may have lost strength, while visible mold or a persistent musty odor can signal a moisture problem that needs further assessment. Avoid covering affected material with new flooring before determining whether it can be repaired or needs replacement.
A flooring professional can inspect the area and help identify the right repair. Replacing damaged sections may be necessary to provide a sound, stable base for the new floor. The subfloor preparation guide notes that soft or squishy wood may indicate a problem requiring replacement. If you see mold, avoid disturbing a large affected area yourself; a qualified specialist can advise on safe removal and any needed repairs.
Ask a flooring professional to assess persistent moisture or needed mitigation
If readings remain high after repairs and drying, get professional advice before installing flooring or applying a moisture-control product. A flooring professional can review your test method, compare the results with the flooring and adhesive requirements, and help determine whether further investigation or a mitigation system is appropriate.
Professional guidance is especially useful when readings vary widely across the room, the subfloor shows signs of damage, or you’re unsure how to interpret the results. ValorCraft Flooring offers flooring installation and subfloor preparation services across North Carolina, with licensed, insured, in-house crews. Ask a professional to assess the conditions and confirm the subfloor is ready for the flooring system you’ve selected.
Prevent Moisture Problems Before Installation
Inspect and prepare the subfloor before flooring materials arrive
Before flooring materials arrive, inspect the subfloor for leaks, water stains, musty odors, soft spots, swelling, and loose or damaged sections. Pay close attention to areas near plumbing, exterior doors, windows, and appliances. The subfloor should be dry, level, clean, and in good repair before installation. Follow the flooring manufacturer’s instructions for flatness, repairs, and surface preparation. This subfloor preparation guide explains why checking the surface in advance matters. If you find signs of moisture, address the source before covering the area with new flooring. Installing over an unresolved problem can affect how the floor fits and performs, and may lead to avoidable repairs later.
Maintain the indoor conditions required for testing and installation
Temperature and humidity can affect moisture readings and flooring performance. Check the instructions for your flooring, underlayment, adhesive, and test method, since each may have different requirements. Keep the space within the specified conditions for the required period, and avoid testing right after a major change to heating, cooling, or ventilation. Some flooring products also need time to acclimate to the indoor environment before installation. For concrete, follow the test kit’s setup instructions; a room hygrometer measures air humidity, not moisture inside the slab. Record the indoor temperature and humidity with your test results so you and your installer can interpret them in context.
Use a vapor retarder or moisture-control system only when product instructions require it
A vapor retarder or other moisture-control system may be appropriate, but the right choice depends on the subfloor, flooring, adhesive, and installation method. Don’t assume every concrete slab needs the same product, or that a barrier will fix an active leak or drainage issue. Check the flooring and adhesive instructions for approved materials, application steps, and moisture limits. The subfloor preparation guide notes that concrete may need a moisture barrier, but the product requirements for your specific installation should guide the decision. If test results exceed those limits, identify the moisture source and confirm the mitigation plan before installation begins.
Schedule time for drying and retesting
If the subfloor is damp or readings exceed the flooring manufacturer’s limits, pause the installation. Give the area time to dry under suitable conditions, then retest using the approved method. Drying time varies based on the moisture source, subfloor material, ventilation, and indoor conditions, so don’t rely on a set number of days. Test the affected area and nearby locations to see whether readings have improved consistently. Keep a record of the dates, locations, and results, and wait to schedule installation until the subfloor meets the product requirements. This moisture-testing guidance also recommends allowing a damp subfloor to dry before retesting.
Ask a licensed flooring professional to verify test results and subfloor readiness
Moisture readings can be difficult to interpret because meters, test methods, and flooring products may use different units and limits. If results are inconsistent, unexpectedly high, or unclear, ask a licensed flooring professional to review the test setup and explain what the readings mean for your project. A professional can help identify areas that need more inspection, confirm whether moisture control is needed, and check that the subfloor is ready for your flooring and adhesive. ValorCraft Flooring’s installation services include subfloor preparation, with licensed, insured in-house crews. Share your test results and product details so the next steps follow the requirements for your specific floor.
Related Articles
- Concrete Floor Installation: 7 Steps for a Lasting Floor | ValorCraft Flooring
- Subfloor Preparation | ValorCraft Flooring
- Laminate Wood Flooring: Pros, Cons, and Best Uses | ValorCraft Flooring
- 7 Durable Flooring Options for Every Room | ValorCraft Flooring
- Hardwood Floor Sanding vs Replacement: Cost Guide | ValorCraft Flooring
Frequently Asked Questions
Can I install flooring if the subfloor looks dry?
Not based on appearance alone. Moisture can remain below the surface or in specific areas of the room. Use the test method and limits specified for your flooring system before installation.
How many places should I test?
Test several locations, including the center of the room and areas near plumbing, exterior walls, or visible damage. Record each result and location so you can check unusual readings again.
Are acceptable moisture levels the same for every type of flooring?
No. Requirements vary by flooring product, subfloor material, adhesive, and test method. Check the instructions for every part of your installation system before comparing results.
What should I do if one reading is much higher than the others?
Check that your meter or test setup is correct, then repeat the reading and test nearby spots. If the result remains high, look for a moisture source and hold off on installation until the issue is addressed.
When should I ask a flooring professional for help?
Ask for guidance if readings stay high, vary widely, or are difficult to interpret, or if the subfloor feels soft or appears damaged. ValorCraft Flooring offers subfloor preparation and flooring installation services across North Carolina.