Quarter Round & Trim Installation
Tight-fit quarter round, shoe molding, and base trim installation with crisp miters, scribed transitions, and a clean paint-ready finish.
- Veteran-Owned & Operated
- Licensed & Insured
- In-House Crews — No Subcontractors
Built for Buildings That
Can't Slow Down.
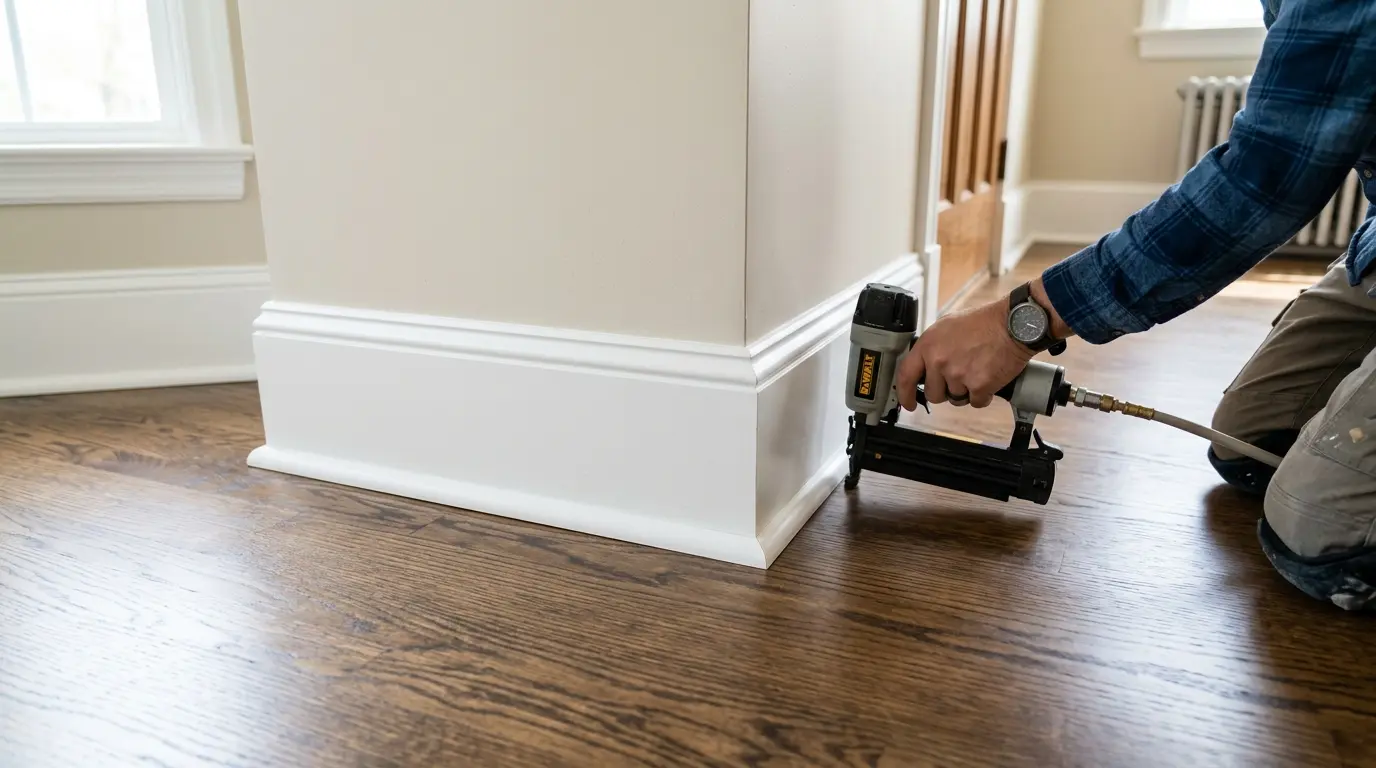
Quarter round and base shoe are the last thing that goes in and the first thing someone notices when it's wrong. A gap at the casing, a miter that doesn't close, a piece that's face-nailed to the floor instead of the base — they're small details that undercut an otherwise clean installation. ValorCraft treats trim as finish carpentry: coped at inside corners, mitered tight at outside corners, undercut at door casings so the trim slides cleanly underneath, and nailed to the base — never to the floor — so the flooring beneath can move without pulling the trim with it.
- Coped inside corners — not butted or mitered — so seasonal wood movement doesn't open a gap
- Door casings undercut and trim slid underneath rather than notched around the profile
- Nailed to the baseboard, never to the floor — floating floors need room to expand
- Paint-grade and stain-grade trim handled — nail holes filled on paint-grade for a clean finish coat
Full Commercial Scope —
Demo To Punch List.
One contract, one crew. Substrate prep, install, transitions, and base — everything that touches the floor stays under our scope.
Quarter Round Installation
3/4" quarter round installed at the base-to-floor transition — coped at inside corners, mitered at outside corners, and nailed into the baseboard to allow floor movement underneath.
Shoe Molding Installation
Shoe molding (slightly flatter profile than quarter round) installed where a lower-profile trim is required — same coping, mitering, and fastening approach as quarter round.
Base Molding Installation
Full baseboard installation or re-installation after flooring is complete — scribed to irregular walls, level transitions at doorways, and coped at inside corners for a tight fit.
Stair Nosing Trim
Trim at stair landings and bottom-tread transitions where the floor meets the stair — fitted tight to the nosing profile with no exposed gap between the trim and the tread edge.
Casing Undercuts
Door casings and jamb legs undercut with a pull saw, multi-tool, or jamb saw so the floor and trim slide cleanly underneath — no notching around the casing profile.
Scarf Joints on Long Runs
Long walls joined with a 45° scarf joint at a stud location rather than a butt joint — so the seam stays tight even if the trim moves slightly with humidity.
Nail Hole Fill — Paint-Grade
Fastener holes filled with non-shrinking filler on paint-grade trim and sanded smooth — so the painter can go straight to a finish coat without prep work.
The Commercial Standard
PMs Keep Calling Back.
Veteran-owned discipline applied to commercial flooring — clean schedules, accurate scopes, and crews that close out the punch list the first time.
Coped Corners That Stay Tight
Inside corners coped so that seasonal wood movement doesn't open a visible gap. Mitered inside corners look good on install day and open up over time — coped corners don't.
Nailed to the Base, Not the Floor
Trim nailed to the baseboard allows the floor below to expand and contract without pulling the trim away from the wall. Trim nailed to the floor locks two moving materials together and the result is gaps or bowing.
Casing Undercuts Done Right
We undercut casings and slide trim underneath rather than notching around them. The result reads as a continuous run — no interruptions, no filler visible at the casing base.
Consistent Reveal
Consistent gap between the bottom of the baseboard and the top of the trim maintained throughout — so the trim line reads level and intentional, not like it was installed wall by wall.
In-House Crews
Same crew that installed your floor installs your trim — they know where the expansion gaps are, which walls have slight bows, and how the floor transitions at every door.
Veteran-Owned Detail
We don't rush the last five percent. Trim is what a homeowner or builder sees first at final walkthrough — we treat it that way.
Five Steps. No Surprises.
Schedules That Hold.
The same process whether it's one suite or one hundred — clear scope, clean prep, phased installs, and a closed punch list.
- 01
Scope Confirmation
We confirm the trim profile, species (paint-grade MDF, pine, or stain-grade hardwood), which rooms are in scope, and whether base is being added, replaced, or re-used — before any material is ordered.
- 02
Casing Undercuts
Door casings and jamb legs undercut to the finished floor height plus trim height so the trim piece slides underneath without notching or gaps at the casing base.
- 03
Trim Cut & Fit
Inside corners coped with a coping saw; outside corners mitered on a miter saw; long runs scarfed at studs; each piece dry-fit before fastening.
- 04
Fasten & Set
Trim nailed into the baseboard at stud locations with a finish nailer; fastener heads set below the surface on stain-grade or filled on paint-grade.
- 05
Fill, Sand & Walkthrough
Nail holes filled on paint-grade work; trim inspected for gaps at corners and casings; final walkthrough with you to confirm the finish before we close out the job.
Answers
Before You Ask.
What's the difference between quarter round and shoe molding?
Quarter round has a 90° profile — equal height and depth, like a quarter of a circle. Shoe molding is slightly taller than it is wide and has a more gradual curve, giving it a lower-profile look. Both serve the same purpose: covering the expansion gap between the floor and the baseboard. Shoe molding is common where a lower-profile trim coordinates better with the base design.
Why is trim nailed to the base and not the floor?
Floating floors — LVP, laminate, and hardwood — expand and contract with humidity changes. If the trim is fastened to the floor, it locks the floor to the wall at that point and the floor either buckles or pulls the trim away from the base over time. Nailing to the base keeps the floor free to move.
Do you cope or miter inside corners?
We cope inside corners. Mitered inside corners look clean on day one but open up when the trim dries slightly or the wall isn't a perfect 90°. A coped corner stays tight regardless of seasonal movement because one piece butts flat and the other is cut to the profile of the piece it meets.
Can you install trim over an uneven or bowed wall?
Yes — we scribe trim to irregular walls rather than forcing a straight piece against a bowed surface. On severely out-of-plumb walls, we discuss whether the trim or the wall needs to be addressed — sometimes a small amount of shim or caulk is the right answer, sometimes the wall needs to be addressed first.
Do you install new base molding as well as quarter round?
Yes. Full baseboard installation can be included in scope — installed before quarter round goes on, or re-installed after the floor if the old base was removed during demo. Paint-grade MDF base or stain-grade hardwood base are both options.
When should trim be installed relative to painting?
The most common sequence is: floor installed, trim installed and nail holes filled, trim painted by the painter with walls already painted. Some painters prefer to paint walls and caulk after trim is set. We coordinate with your painter's preference on sequencing — but trim goes on after the floor, always.
Serving the
Piedmont Triad, NC.
ValorCraft Flooring proudly installs residential and commercial flooring across the Piedmont Triad and surrounding North Carolina communities.
Schedule In Your Area- 01High Point
- 02Greensboro
- 03Winston-Salem
- 04Lexington
- 05Kernersville
- 06Thomasville
- & surrounding Triad areas
Ready to Upgrade Your Floors?
From first estimate to final walkthrough, ValorCraft Flooring delivers professional flooring built to last.
(336) 596-7835 · valorcraftflooring@gmail.com